Overwatered gardenia plants let you know that they are dying with various symptoms. While it is possible to revive your dying gardenias, you have to do so quickly or else they will die.

How can you tell if you are overwatering your gardenias? Read this complete guide to keep gardenias alive.
JUMP TO TOPIC
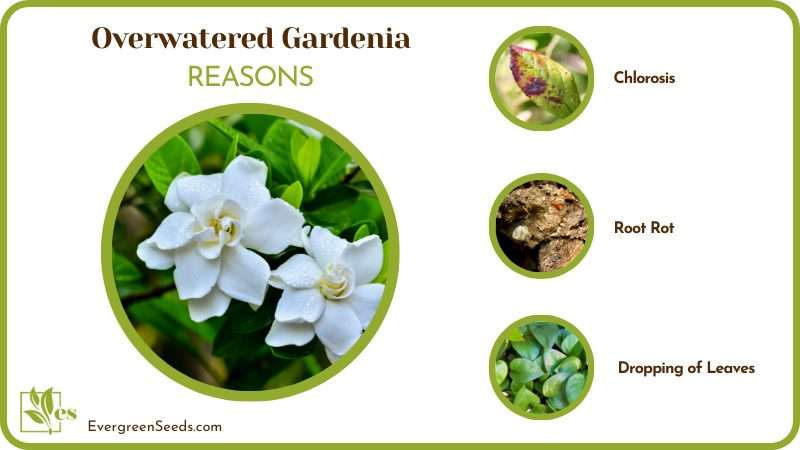
How To Tell That Your Gardenias Are Overwatered
Here are some symptoms through which your gardenias tell you that you are overwatering them:
– Chlorosis
Chlorosis in gardenia plants means that your gardenia’s leaves are turning yellow or losing their green coloration. Chlorosis caused by overwatering your gardenias usually starts with the lower and older leaves. When you see that the leaves of your gardenia plants are becoming yellow, you should water the plants less often.
– Root Rot
Root rot is a disease caused by different fungi species. The soggy soil suffocates the roots of your gardenia, and as the roots die, they are acted upon by fungi which can attack other healthy roots.
Root rot can kill your gardenia plants, so you should stop watering the plants and treat them as soon as possible.
– Leaves Becoming Brown
After chlorosis and root rot, the next symptom of an overwatered gardenia plant is browning leaves. Brown leaves in overwatered gardenia plants do not feel dry or flaky when touched, so you should examine them closely.
Brown leaves signify that your gardenias are dying, so you need to find a way to treat the plants immediately.
– Wilting of Leaves
When not treated, you will see that more leaves of your gardenia plant will start wilting. In this case, the leaves will feel dry and flaky. This symptom is among the final ones before your gardenia plant finally dies. You should not grow your gardenias in waterlogged soil or overwater them until their leaves start to wilt.
– Dropping of Leaves
Your wilted gardenia leaves will start to drop off from the plant if you still do not solve the problem. When leaves start to wilt and drop from your gardenia, you may find it more difficult to revive the plant, so you should never abandon your gardenias when they get to this phase. You should check and amend the soil while you reduce how frequently you water the plants.
– Dropping of Flower and Fruit Buds
Aside from the leaves of your gardenias, the flower and fruit buds of your plant will start to drop off as well. Dropping of flower and fruit buds has a lot of causes, but if the other symptoms mentioned above are also occurring in your gardenia plants, it means that the plants are overwatered.
– Wilting of the Entire Gardenia Plant
After the leaves, flowers and fruit buds of your gardenia plants drop away from the plants, you should notice that the stem and branches will wilt as well. Your gardenia branches dying is the final stage of your gardenia dying.
You cannot revive your gardenias when they get to this phase as almost every cell in the plant is dead by now. Never overwater your gardenias until they get to this phase.
If you notice that you are overwatering your gardenias early on, you can still revive them. Continue reading to learn how to bring a gardenia back to life.
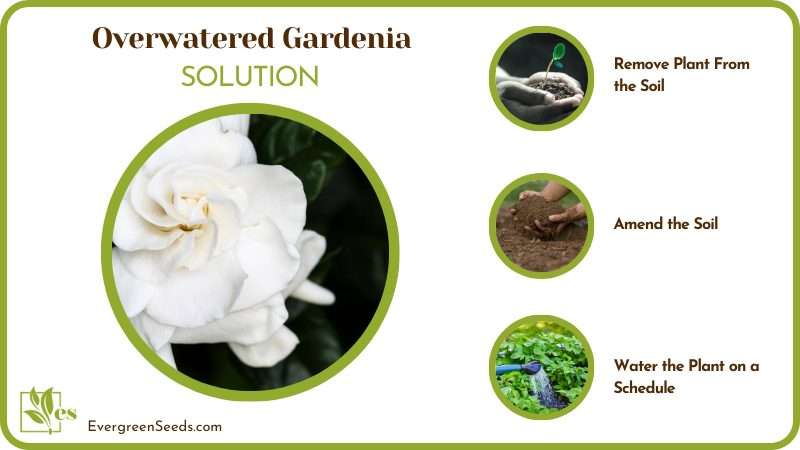
How To Revive a Dying Gardenia
Follow the steps below to rejuvenate a gardenia:
– Remove Plant From the Soil
The first thing that you should do is to remove the gardenia from the soil or pot. Your plants may be overwatered because the soil is too compacted and not well-drained. Removing the plants from the soil can help you work on the soil, check the roots of the plant, and remove dead roots.
– Amend the Soil
If the soil is too compacted, retains a lot of moisture and is not well-drained, you should amend it. Amend the soil by adding sand, grit, perlite and other materials that can boost the aeration of the soil. After amending the soil, you should bake it to kill fungi, bacteria and other harmful microbes that can be in it.
For potted plants, make sure that the pots have drainage holes through which excess water can drain off. Your gardenia pots should have 2-3 drainage holes. You can also place rocks in the pot before adding the soil to help water drain quickly.
– Remove Dead Roots and Leaves From the Plant
Before replanting your gardenia plants back into the soil, remove dead roots and leaves. Dead roots are brown and ugly to look at, and dead leaves are brown and wilting. If you do not remove the dead roots and leaves, you may attract fungi species that can cause root rot. After pruning off the dead roots and leaves, you can then replant the gardenia.
– Replant the Gardenia
When replanting your gardenia, make sure that the root crown is directly above the soil. The root crown is the region where the roots and the stem meet. Keep the root crown just above the soil for proper aeration.
Make sure that the soil is well-drained.
– Water the Plant on a Schedule
Now that you have replanted your gardenias, you should be careful with the way you water them. Even though gardenias prefer consistently moist soil, they do not like soggy soil at all. Only water your plants when the soil is almost dry. As a tip, you should place your indoor gardenias on a windowsill so that the sun can help evaporate excess moisture from the soil.
After following the steps above, your gardenia plants will revive and grow strong.
Watering Tips for Gardenias
Some extra watering tips for your gardenia includes:
- Consistently moist soil: Gardenias love consistently moist soil but not a soggy one. To help maintain the moisture of your gardenia soil, you should mulch it with organic mulch. Organic mulch also serves as a slow-release fertilizer for your gardenias.
- Misting your plants: You should mist your gardenia leaves with water droplets. Misting helps your gardenia leaves to remain green and fresh. Do not mist your gardenia leaves until they start dripping water, that will be too much.
- Well-drained pots: For your potted gardenia, always pay attention to the pots and potting mix as most watering problems are caused by the pot you use.
Care
Here are some additional tips to keep your gardenias healthy and strong:
- Light requirements: Gardenias prefer bright light. They do not need direct sunlight but grow better when planted where they can get direct light.
- Humidity requirements: They need more than the average humidity. Grow your gardenias in a room with around 65 percent humidity. You can mist them with water droplets or install a humidifier.
- Temperature requirements: Gardenias grow best in USDA hardiness zones 8-11. During the day, the temperature should range from 65-70 degrees Fahrenheit, while 60-65 degrees Fahrenheit is best for gardenias at night.
- Nutrient requirements: Gardenias love nutrient-rich soil, so you should fertilize them regularly. You can also use compost to amend the soil. When using plain soil, you should fertilize your plants every 2-4 weeks during the growing season. Use an indoor plant fertilizer.
- Pruning your gardenias: To encourage bushy growth, you should prune your gardenias. Prune them when they are dormant in late winter to promote the growth of new branches during the new growing season.
- Repotting your plants: If your gardenias grow larger than their current pots, you should repot them into a pot that is 2-4 inches larger. Also, you should repot your plants if the previous pot or potting mix has problems.
Make sure that you grow your gardenias in the right conditions.
Gardenia Problems That You Can Prevent
Aside from overwatering your gardenias, some extra problems that you can prevent are:
– Pests and Diseases
Your gardenia plants can be attacked by pests such as aphids, whitefly, spider mites, snails and mealybugs. You should pick and kill these pests as soon as you see them. Alternatively, you can repel them with pesticides or soapy water.
Some popular gardenia diseases caused by harmful bacteria or fungi are stem canker, Sooty mold and Powdery mildew. You can easily cure your plants with recommended products from gardening stores near you.
– Insufficient Light
Insufficient light can cause chlorosis, stunted growth and weak plants. You should make sure that your gardenias receive at least four hours of sunlight every day. You can also grow your plants using grow lights, just make sure that they receive enough light.
– Soil pH
Gardenias need an acidic pH of 5-6. Unsuitable pH can affect the way your gardenias absorb water and nutrients, so you want to make sure that your plants are grown in the right soil pH. You can correct your gardenia soil pH with products such as vinegar, compost, coffee grounds, etc.