

Growing carrots in your garden can be both rewarding and fascinating as these root vegetables often reveal their quality only at harvest time. But the journey from sowing to picking involves several crucial steps to ensure a bountiful harvest. One of the most important practices is thinning carrot seedlings. Thinning ensures that each carrot has enough space to develop properly without competition for nutrients, water, and sunlight. My experience has shown that this process, albeit sometimes tedious, is key to cultivating carrots that are well-shaped and of good size.
From the moment you cover your freshly sowed carrot seeds with soil, the anticipation for sprouting begins. In my garden, carrot seeds typically take between 14 to 21 days to germinate. Keeping the soil consistently moist during this period is critical. Once the seedlings reach about two inches in height, it’s time to start thinning. Based on the variety of carrots and their size requirements, the spacing between plants after thinning will vary. Having gone through this process many times, I’ve learned that achieving the right spacing is essential for the growth of healthy carrot roots.
JUMP TO TOPIC
Preparing the Soil for Optimal Carrot Growth
Before diving into the specifics, it’s essential to understand that preparing the soil is a foundational step in growing robust carrot seedlings. Quality soil, proper spacing, and adequate moisture are key factors in ensuring successful carrot development.
Selecting the Right Soil Type
Carrots thrive in soil that is light and loose to allow for proper root expansion and prevent deformities. As a gardener, I focus on achieving a soil texture that is free of rocks and clumps, which can obstruct growth. Raised beds often offer the best soil conditions because they promote good drainage and reduce the chances of waterlogging, which is detrimental to carrot roots. I enrich my soil with organic matter, such as well-rotted compost or aged manure, to provide the necessary nutrients for optimal plant growth.
Spacing and Planting Techniques
When planting carrots, spacing is crucial to avoid overcrowding and to provide each seedling enough room to grow. For my plantings, I follow these guidelines:
- Seed Spacing: I sow pelleted carrot seeds to ensure even spacing and ease planting. Typically, I aim for seeds to be placed about 2 to 3 inches apart.
- Row Spacing: Plan for rows to be spaced 6 to 8 inches apart. This allows light and air to circulate freely, preventing fungal diseases.
After sowing, I cover the seeds gently with a thin layer of moist soil.
Watering Essentials for Seedlings
Consistent watering is necessary to maintain even soil moisture, which is critical for germinating carrot seeds. I water my carrot beds with a gentle spray to prevent any disturbance of the seeds or newly formed seedlings. Throughout the growing process, the goal is to keep the soil consistently moist but not waterlogged. To achieve this, I recommend a weekly deep watering regime, which encourages the roots to grow deeper in search of moisture, thus promoting strong root development.
Carrot seedlings may take one to three weeks to emerge, and the soil’s top layer should remain moist during this time. Adequate watering from the start not only boosts germination rates but also supports the overall health of the plants as they mature.
The Importance of Thinning Carrots
Thinning carrot seedlings is critical for avoiding crowding and ensuring carrots have ample space for optimal growth. Let’s dive into the steps for successful thinning, the importance of proper spacing, and the tools you’ll need.
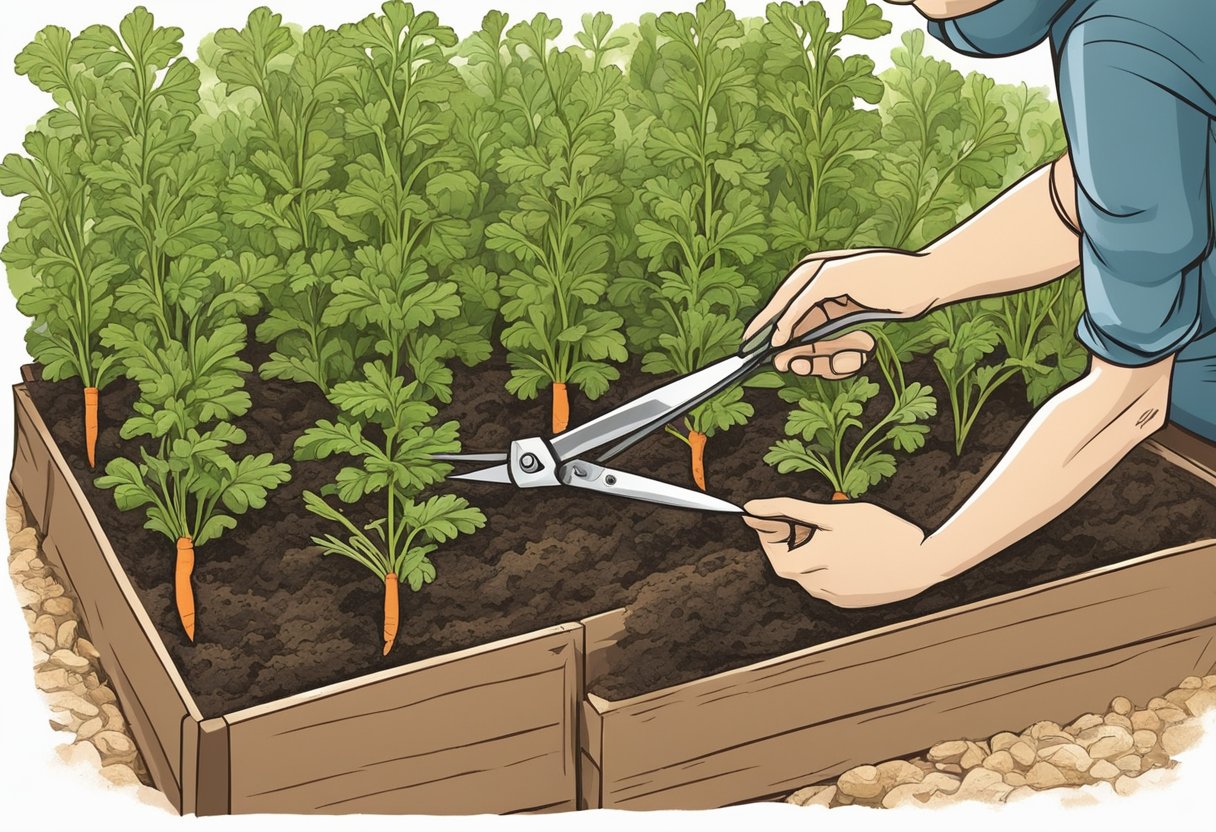
How to Thin Carrot Seedlings Successfully
💥 Key Steps:
- First Thinning: When the carrot seedlings are about 2 inches tall, it’s time for the first thinning. I snip off the excess seedlings at soil level using scissors or garden shears, to avoid disturbing the roots of remaining plants.
- Second Thinning: If needed, a second thinning can be done a few weeks later to provide even more room for growth, particularly for varieties that develop larger roots.
It’s essential to thin carrots gently to minimize damage to the roots of the seedlings you’re keeping.
The Role of Spacing in Carrot Development
Proper spacing after thinning is crucial for carrot development. Seedlings need adequate room to grow both in terms of width and depth. I aim for:
- Minimum Spacing: About 1 to 2 inches between each plant after the first thinning.
- Final Spacing: 3 to 4 inches apart after the second thinning, depending on the carrot variety.
This spacing helps to eliminate competition for nutrients, water, and light, ensuring that each carrot has what it needs to thrive.
Tools and Methodologies for Effective Thinning
For thinning carrots, I use:
- Scissors: Sharp and precise, scissors allow for careful snipping of unwanted seedlings.
- Garden Shears: For thicker clusters, garden shears offer a strong and sharp cut.
Besides using the right tools, the methodology of thinning carries equal importance. I ensure the soil is moistened before thinning, which makes the process easier and less stressful on the plants. It’s essential to approach the task with patience, as hasty thinning can harm the delicate seedlings.
Overcoming Challenges in Carrot Cultivation
Cultivating carrots can involve multiple hurdles, but with proper strategies and vigilance, you can navigate these challenges with confidence. I’ll cover key aspects like pest management, weather adaptation, and techniques to ensure a healthy, bountiful harvest.
Dealing With Pests, Diseases, and Weather
My experience has taught me that a proactive approach is crucial in managing pests and diseases. Carrot fly is a common pest that targets the roots, requiring early action to mitigate damage. Covering carrot seedlings with fine netting can keep these pests at bay and protect the developing taproot. It’s also important to be alert to the presence of fungal diseases, which thrive in damp conditions. Ensuring good air circulation and practicing crop rotation can significantly reduce these risks.
Weather, too, can be unpredictable and challenging. Excessive heat can stress carrot plants, so I often plan my thinning activities for cooler parts of the day or overcast conditions to minimize plant stress. In the case of excessive rain or moisture, raised beds can provide better drainage to prevent overcrowding and disease.
💥 Pest Management Tip
Achieving a Bountiful Harvest Despite Common Pitfalls
Aiming for a bountiful harvest means giving each carrot seedling its own space to grow. I meticulously thin seedlings to prevent overcrowding, allowing each carrot room to develop properly, which leads to larger, more flavorful carrots. This also eases weeding and reduces competition for nutrients.
Knowing when to harvest mature carrots is another key part of cultivation. While some prefer younger, tender carrots, allowing them to mature fully can enhance their sweetness and flavor. Balancing moisture through regular watering and a layer of mulch keeps the soil moist and prevents the taproot from becoming too fibrous.
Successful cultivation and achieving a bountiful harvest depend not just on handling immediate concerns but also on maintaining consistent care and observation throughout the carrot’s lifecycle.
Harvesting and Maintaining Carrot Quality
When I harvest carrots, my main goal is to ensure that the yield is not only abundant but also that the carrots maintain their best quality. Healthy growth throughout the development phase is pivotal, and this diligence extends to the harvesting process.
When to Harvest:
I prefer to harvest carrots when their color is rich and they’ve reached the desired size—usually when the carrot tops are around 1-inch in diameter. Timing is crucial, as overgrown carrots can become tough and woody.
Ensuring Quality:
To prevent misshapen carrots, it’s essential to maintain loose, well-drained soil. If the carrots are overcrowded, nutrients get divided, leading to smaller carrots. I always make sure there’s enough space between the plants.
To maintain carrot quality after harvesting, I immediately remove the greens to prevent them from drawing out moisture and nutrients from the roots.
Aftercare Tips:
- Storage: I store carrots in a cool, humid place to maintain their crispness.
- Watering: Regular, deep watering during growth promotes strong and healthy carrots.
- Soil Check: Loose soil supports straight growth, so I aerate my soil regularly.
💥 Note: Avoid washing carrots before storage as excess moisture can encourage rot.
Harvesting Carefully:
Finally, when pulling carrots from the ground, I aim to apply even, gentle pressure to avoid snapping them. If the ground is hard, I use a garden fork to ease the process, thus preserving the quality of the carrot’s shape and taste.


